Claridge
House
Manual
Topic:
How to Reset Your Wi-Fi Router
If you’re experiencing issues with your internet connection, a simple Wi-Fi router reset can often resolve them. This process reboots the device, clearing temporary glitches and refreshing its connection to your internet service provider.
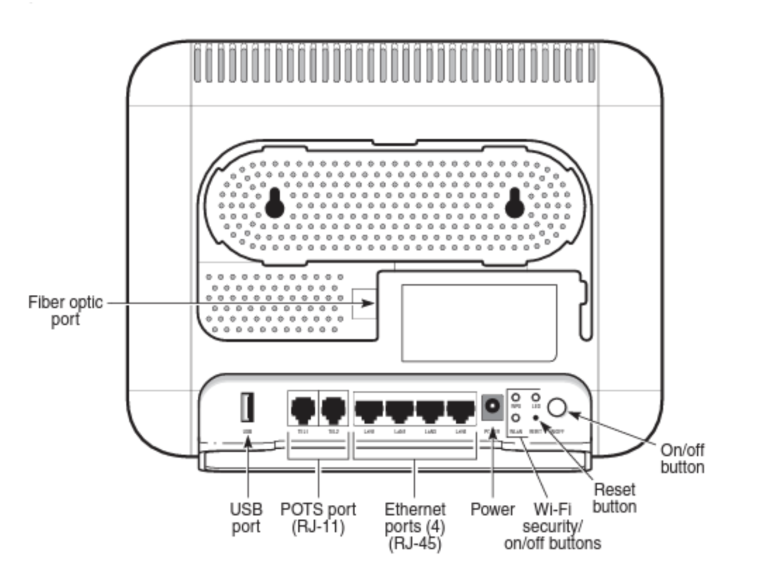
Location of the Router:
Your Wi-Fi router is typically located in the utility cabinet, which is usually situated near the main entrance of your home or apartment. This cabinet often houses other essential utilities and network equipment.
Resetting the Router:
- Locate the Power Button: On the back panel of the Wi-Fi router, you will find an on/off button. This is usually a small, recessed button that controls the power supply to the device.
- Turn Off the Router: Press this button to power down the router. You should see all the indicator lights on the front of the router turn off, signifying that it is no longer receiving power.
- Wait a Few Seconds: After turning the router off, wait for approximately 10 to 15 seconds. This brief pause allows the router’s internal components to fully discharge and reset.
- Turn on the Router: Press the on/off button again to restore power to the router. You will notice the indicator lights on the front of the router begin to illuminate. These lights typically indicate power, internet connectivity, and Wi-Fi signal.
After the Reset:
It may take a few minutes for the router to fully boot up and re-establish its connection to the internet. Once the indicator lights show a stable connection (often a solid green light for internet and Wi-Fi), you should be able to connect to your Wi-Fi network and access the internet as usual. If you continue to experience problems, you may need to get in touch with the SLO team.
Utility Room / Laundry Area
For your convenience, the utility room and laundry area are discreetly located within the apartment. To access this essential space, simply open the white door. This door is typically situated near the main entrance or the living room, ensuring easy access from the primary living areas.
Inside the utility room, you will find everything you need for laundry and light cleaning. The well-equipped laundry area includes a washing machine/tumble dryer, allowing you to manage your laundry needs efficiently during your stay.
In addition to the laundry facilities, the utility room also houses an iron and an ironing board, enabling you to keep your clothes fresh and wrinkle-free. A Hoover vacuum cleaner is also provided for your use, making it easy to maintain the cleanliness of the apartment during your visit.
Finally, for your connectivity needs, the Wi-Fi router is also located within the utility room. This central placement ensures optimal signal strength throughout the apartment.
Operating the Siemens Wash & Dry Machine
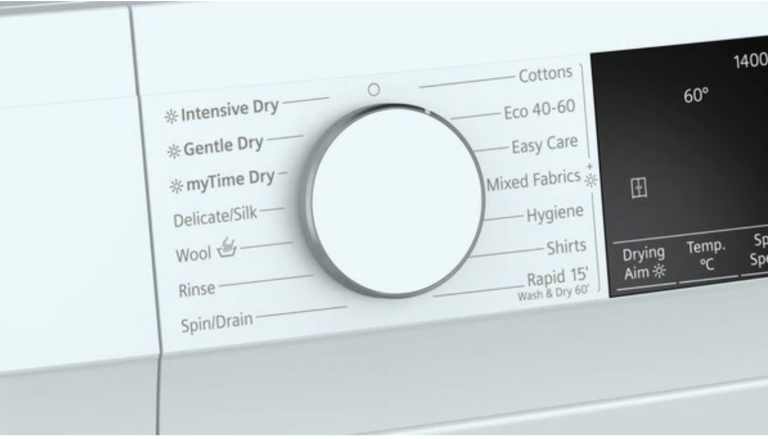
Your apartment is equipped with a convenient Siemens Wash & Dry machine, located within the utility cupboard. This guide will walk you through its operation for both washing and drying cycles.
To begin a wash cycle, locate the main control wheel on the front panel of the machine. Gently turn this wheel to select your desired wash program. The programs are typically labelled with symbols or text indicating different fabric types (e.g., cotton, synthetics, delicates) or wash intensity (e.g., quick wash, eco wash). Refer to the machine’s display or accompanying symbols for detailed descriptions of each program.
Washing Your Laundry:
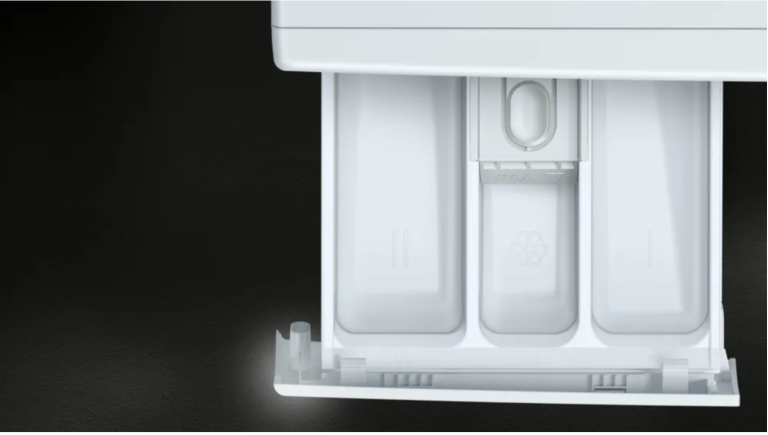
Before starting the cycle, remember to load your laundry into the drum. You will find complimentary laundry soap and detergent provided for your convenience. Dispense the appropriate amounts into the designated compartments within the detergent drawer, usually located at the top left of the machine.
Once your laundry is loaded and detergent added, and your desired wash settings are selected via the control wheel, press the ‘Start’ button to initiate the wash cycle. The machine will then automatically proceed with the chosen program.
Drying Your Laundry:
The Siemens Wash & Dry machine offers various drying options to suit your needs. After a wash cycle, or if you are only drying clothes, select your preferred drying type by turning the control wheel to the appropriate symbol.
- Iron Symbol (Less Creased): Choosing the iron symbol will result in clothes that are less creased and significantly easier to iron. This setting is ideal for items like shirts, blouses, or trousers that require a smooth finish.
- Cupboard Symbol (Ready to Wear/Store): The cupboard symbol indicates that your clothes will be thoroughly dried and ready to be put directly into your wardrobe or drawers without further drying. This is suitable for most everyday items.
- Plus Function: In addition to these primary drying options, the machine features a “plus function.” This typically offers an extended or more intensive drying cycle, which can be useful for very thick fabrics or if you desire a higher level of dryness for certain items. Consult the machine’s specific instructions for the exact benefits of this function.
Once you have selected your desired drying settings, ensure the ‘Start’ button is pressed to commence the drying cycle.
Finishing a Cycle:
Upon completion of either a wash or dry cycle, the machine will indicate that it has finished. To power down the machine, simply turn the main control wheel back to the ‘Off’ position. You can then safely unload your clean and dry laundry.
Operating Your Siemens Oven:
1. Powering On the Oven
To begin, locate the “on” button on your Siemens oven. Pressing this button will activate the touchscreen display, making it ready for your input. The touchscreen interface is designed for intuitive navigation and control of the oven’s various features.
2. Selecting Cooking Functions
Once the touchscreen is active, you can choose from a range of cooking functions tailored to different culinary needs. For instance, if you wish to utilise the “3D hot air” function, which is ideal for baking and roasting on multiple levels simultaneously, simply select this option from the menu.
3. Setting and Adjusting Temperature
Upon selecting a cooking function, the oven’s intelligent system will often suggest a default temperature. For example, with “3D hot air,” a suggestion of 180 degrees Celsius is common. You have the flexibility to either accept this suggested temperature or adjust it to your precise requirements. Use the touchscreen controls (often arrows or a numerical keypad) to increase or decrease the temperature as needed.
4. Initiating the Cooking Process
After confirming your desired temperature, press the “play” button to commence the cooking process. The oven will then begin to preheat. The display will provide real-time updates, showing the current internal temperature of the oven as it rises, an indication of when it is expected to reach the set temperature, and a timer displaying the elapsed cooking time. This allows you to monitor the progress of your dish.
5. Stopping the Cooking Process
Should you need to stop cooking before the full cycle is complete, locate and press the “stop” button. This will immediately halt the heating process and turn off the cooking function.
6. Turning Off the Oven
When you have finished cooking and wish to power down the oven completely, simply press the “on” button again. This action serves as a toggle, turning the oven off and deactivating the touchscreen display.
Important Considerations:
- Preheating: For optimal cooking results, especially when baking, allow the oven to fully preheat to the desired temperature before placing food inside.
- Safety: Always exercise caution when opening and closing the oven door, as hot air and steam can escape. Use oven mitts to handle hot dishes and trays.
- Cleaning: Regular cleaning of the interior and exterior will help prevent grease buildup and maintain a hygienic cooking environment.
- Troubleshooting: If you encounter any issues with your Siemens oven, contact SLO customer support for assistance
By following these simple steps, you can effectively operate your Siemens oven and enjoy its advanced features for a wide variety of culinary endeavours.

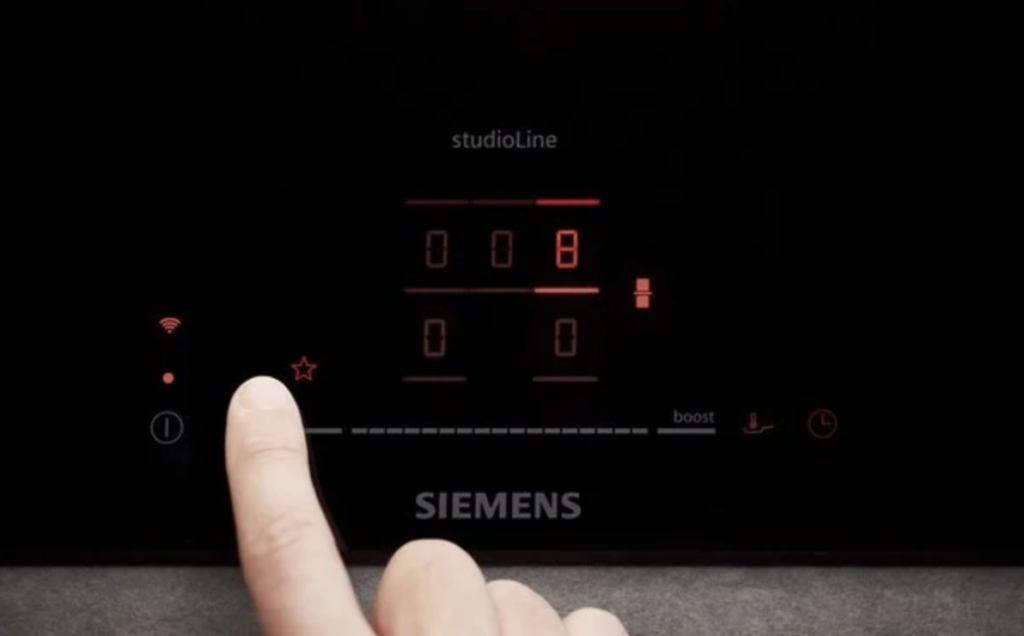
Operating the Siemens Induction Hob:
This guide provides detailed instructions on how to effectively use your Siemens induction hob, along with important safety information and troubleshooting tips.
Safety Features of the Induction Hob:
The Siemens induction hob incorporates advanced safety features, making it a secure appliance for your home, especially with children around. The primary safety mechanism is its reliance on magnetic induction to generate heat. This means:
- Pan Detection: The hob will only generate heat when a pan or pot made of a compatible magnetic material (such as cast iron or stainless steel) is placed directly on the cooking zone. Without the presence of metal, the hob surface remains cool to the touch.
- Reduced Risk of Burns: Because the hob itself does not heat up, but rather the cookware directly, the risk of accidental burns from touching the surface is significantly minimised.
- Child Safety: This inherent safety feature makes the induction hob a safer choice for households with children, as curious hands are less likely to encounter a hot surface.
Troubleshooting: Hob Not Responding or Turning On:
If you encounter an issue where the hob does not respond or fails to turn on, the most common reason is that the child lock feature has been activated.
- Unlocking the Hob: To unlock the hob and restore full functionality, simply locate the “lock” button on the control panel and press it firmly. The lock indicator light (if present) should turn off, and the hob will then be operational.
By following these instructions, you can safely and efficiently utilise your Siemens induction hob for all your culinary needs.

Operating the Fan Extractor for the Siemens Induction Hob
To ensure a pleasant cooking experience and to effectively remove cooking odours and steam, please follow these instructions for using the fan extractor located beneath the cupboard, specifically designed for use with your Siemens Induction Hob:
- Locate the Fan Extractor: The fan extractor unit is discreetly integrated into the cabinetry, directly above your Siemens Induction Hob. Gently look under the cupboard directly above the hob to identify the unit.
- Powering On the Fan: Once located, you will see a control panel with various buttons. To activate the fan extractor, press the button that features a small fan icon. This action will initiate the ventilation system.
- Adjusting Fan Speed: The fan extractor offers multiple speed settings to accommodate varying cooking demands. To increase or decrease the intensity of the ventilation, utilise the clearly marked ‘plus’ (+) and ‘minus’ (-) buttons. Adjust the speed according to the amount of steam, smoke, or odors being produced during your cooking. Higher speeds are recommended for heavy cooking, while lower speeds are suitable for simmering or light frying.
- Utilizing Additional Lighting: For enhanced visibility on your hob, particularly in lower light conditions, the fan extractor is equipped with additional lighting. Press the dedicated button with a light bulb icon to illuminate your cooking surface. This feature helps in monitoring your culinary creations with greater precision.
- Turning Off the Fan: When your cooking is complete and the need for ventilation has subsided, simply press the fan button (the one with the small fan icon) again. This will deactivate the fan extractor, and the unit will power down. It’s recommended to allow the fan to run for a few minutes after cooking to fully clear any lingering odors or steam from the kitchen.
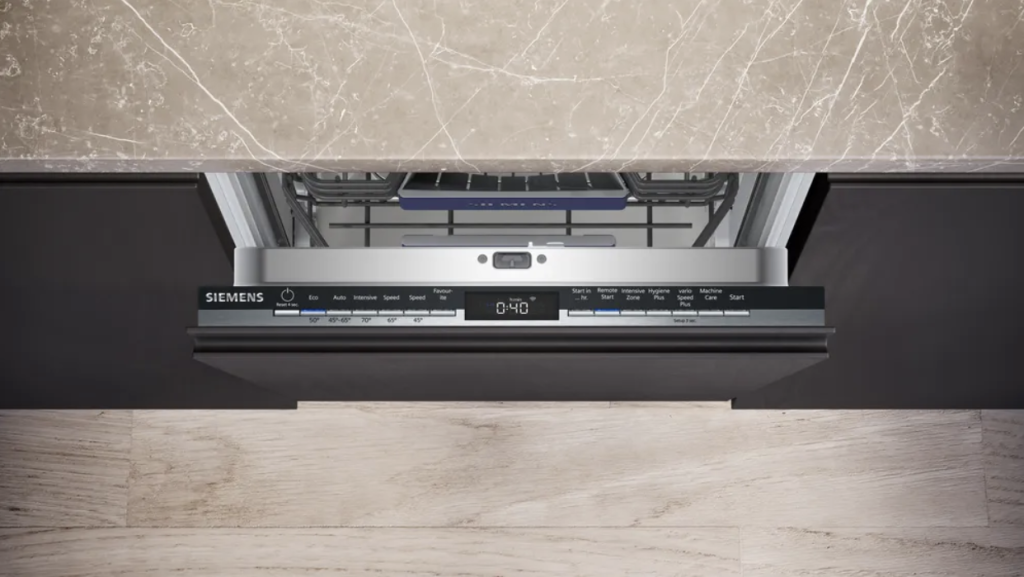
Using the Siemens Dishwasher:
1. Accessing the Dishwasher:
- Locate the Dishwasher: Siemens dishwashers are often designed to integrate seamlessly into modern kitchens, meaning they are typically hidden behind a cabinet panel that matches your kitchen’s aesthetic.
- Open the Door: Gently pull the handle of the cabinet panel to reveal the dishwasher door. Once the panel is open, the dishwasher door itself can be opened by pulling it outwards.
2. Initiating the Dishwasher:
Power On: Locate the “on” button, usually found on the top edge of the dishwasher door or on the control panel. Press this button firmly. You will hear a quick beep, indicating that the dishwasher has powered on and is ready for programming.
3. Selecting Your Desired Settings:
- Explore Program Options: Siemens dishwashers offer a variety of wash programs designed for different types of loads and levels of soil. These programs may include:
- Auto: Automatically adjusts water consumption and temperature based on the soil level detected by sensors.
- Eco: An energy-saving program for normally soiled dishes.
- Intensive: For heavily soiled pots, pans, and cutlery.
- Quick: A shorter program for lightly soiled dishes that need to be cleaned quickly.
- Glass: A delicate program for glassware.
- Consider Additional Functions: Depending on your model, you may also have access to additional functions that optimize the wash cycle, such as:
- Half Load: Reduces water and energy consumption when you have fewer dishes.
- VarioSpeed/Speed on Demand: Shortens the program duration.
- HygienePlus: Provides a higher temperature rinse for improved hygiene.
- Extra Dry: Extends the drying phase for perfectly dry dishes.
- Make Your Selection: Use the control panel buttons or touch screen to navigate through the available programs and functions. Select the combination that best suits your current load. The display will typically show your chosen settings.
4. Starting the Wash Cycle:
- Press “Start”: Once you have selected all your desired settings, press the “start” button. The dishwasher will begin its wash cycle. You may hear water filling the appliance.
5. Cycle Completion and Automatic Door Opening:
- Automatic Operation: The dishwasher will now proceed to wash the dishes according to the selected program. It will meticulously clean, rinse, and then dry the contents.
- Auto Open Feature: A notable feature of many Siemens dishwashers is their automatic door opening at the end of the cycle. Once the washing and drying processes are complete, the dishwasher door will automatically unlatch and open slightly. This allows steam to escape, preventing condensation and promoting more efficient and hygienic drying, ultimately leading to spotlessly clean and dry dishes.
By following these steps, you can effectively utilise your Siemens dishwasher to maintain clean and sparkling dishes with minimal effort.

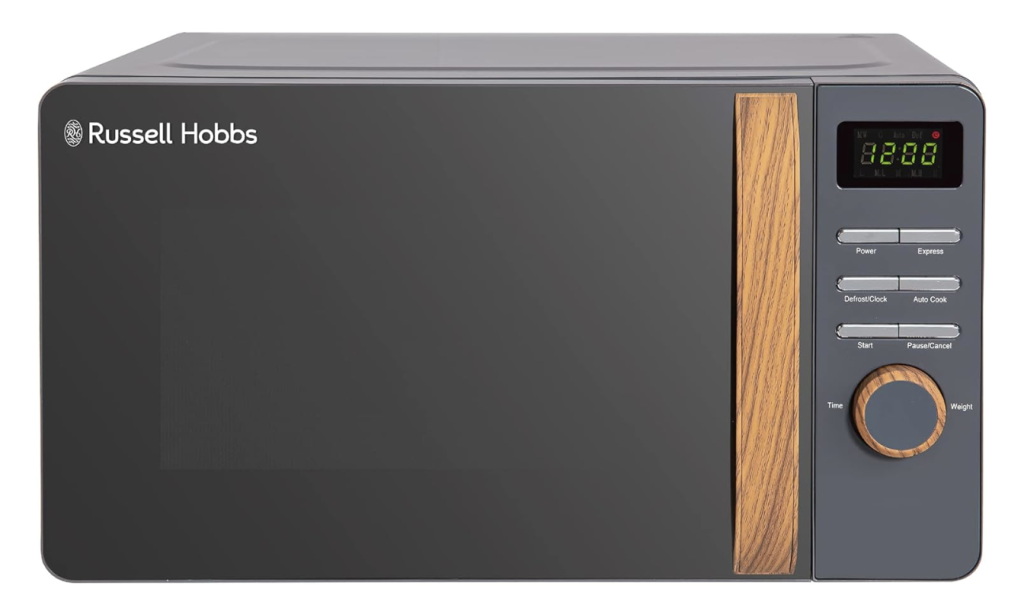
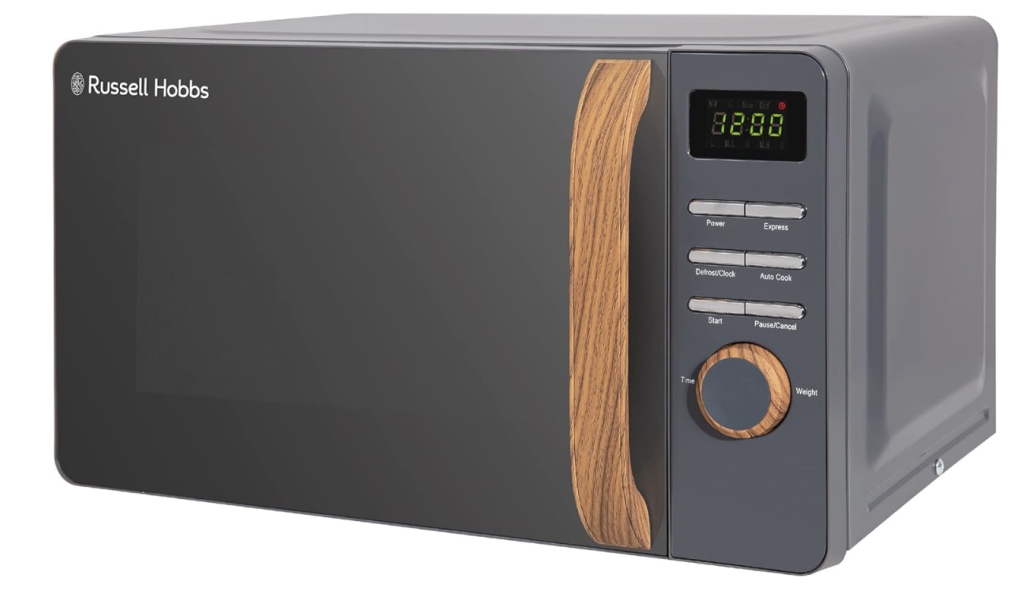
Operating the Russell Hobbs Microwave:
Getting Started:
1. Power Setting Selection:
- Locate the “power” button on the microwave’s control panel.
- Press this button repeatedly to cycle through the available power settings. Each press will typically display a different percentage of full power (e.g., 100%, 80%, 50%, 30%, 10%).
- Choose the power setting that best suits your food item and desired cooking outcome. Higher power is generally used for faster cooking, while lower power is ideal for defrosting or more delicate items.
2. Setting the Cooking Time:
- Once your power setting is selected, gently twist the control wheel.
- As you turn the wheel, the digital display will show the cooking time increasing or decreasing.
- Adjust the wheel until the desired cooking duration is displayed. Be precise to avoid over or undercooking.
Initiating and Managing the Cooking Process:
1. Starting the Microwave:
- After setting both the power and time, press the “start” button.
- The microwave will immediately begin the cooking cycle, and the turntable inside will rotate (if applicable to your model).
2. Pausing the Cooking Cycle:
- Should you need to temporarily stop the cooking process – perhaps to stir food, check doneness, or add ingredients – press the “pause” button.
- The microwave will halt its operation, and the timer will stop counting down. The internal light may remain on, depending on the model.
3. Cancelling the Cooking Cycle:
- To completely cancel the current cooking program and reset the microwave, press the “pause” button a second time.
- This action will clear the remaining cooking time and return the microwave to its standby mode, ready for a new cooking cycle.
By following these simple steps, you can confidently operate your Russell Hobbs microwave for all your heating and cooking needs. Always refer to your food packaging for specific cooking instructions and recommended power levels/times.
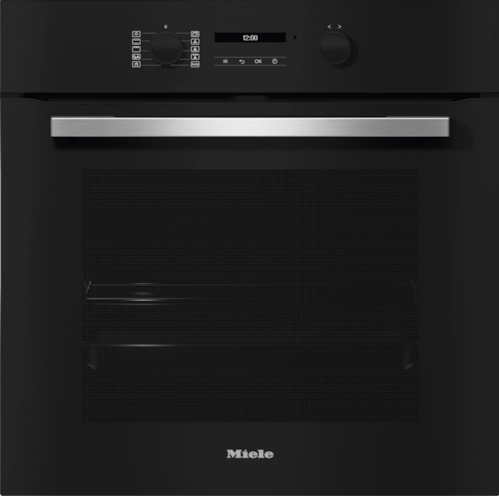
Operating the Miele Oven:
1. Choosing Your Cooking Setting:
The first step is to select the appropriate cooking setting for your dish. Locate the control wheel on the Miele oven and turn it to browse the available options. The Miele oven offers a variety of versatile settings designed to optimize cooking for different food types and culinary techniques. Common settings you’ll find include:
- Fan Plus: Ideal for baking on multiple levels simultaneously, ensuring even heat distribution for pastries, cakes, and roasts.
- Intensive Bake: Perfect for dishes requiring a crispy base, such as pizzas, quiches, or bread, as it provides more direct heat from below.
- Fan Grill: Combines the power of the grill with the circulation of the fan, excellent for browning larger cuts of meat, poultry, or gratinating dishes.
- Automatic: This intelligent setting allows the oven to suggest optimal cooking parameters based on the food type you select. You can often choose from a predefined list of food categories, and the oven will adjust temperature and time accordingly.
As you turn the wheel, the display will show the selected setting. Take a moment to consider the type of food you are preparing and choose the setting that best suits its requirements.
2. Adjusting the Temperature:
Once you have confidently selected your desired cooking setting (for example, “fan plus” for a batch of cookies), the next crucial step is to set the temperature. The Miele oven typically has a dedicated temperature control, often integrated with the same control wheel or a separate dial.
Turn the temperature control to increase or decrease the temperature to the level specified in your recipe. The oven’s display will show the current temperature as you adjust it. For precise cooking, it’s always recommended to preheat the oven to the desired temperature before placing your food inside. The oven will usually indicate when it has reached the set temperature, often with an audible signal or a change in the display.
3. Turning Off the Oven:
When your culinary masterpiece is complete and you are finished cooking, it is essential to turn the oven off correctly and safely. Locate the main control wheel or power button. Turn the wheel back to the “off” position, or press the power button, to completely shut down the oven. This will stop the heating elements and fan, allowing the oven to cool down gradually. Always ensure the oven is fully turned off after use to conserve energy and for safety.